
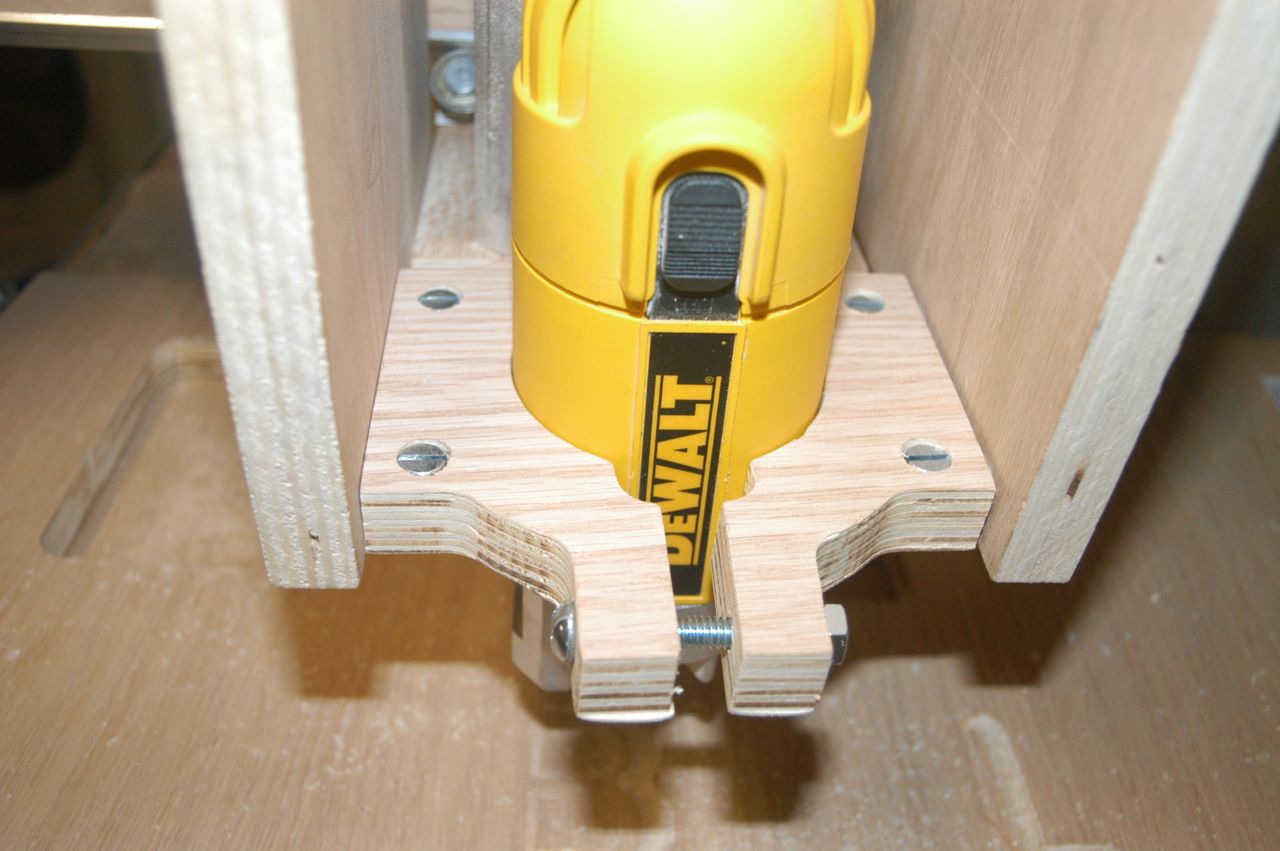
I designed a new router mount for the CNC machine today, and the CNC machine cut it out! Long build notes below, but I just can’t help a “brag photo” first:
oooh, pretty!
OK, here’s how that object came to exist.
I have been unhappy with the original router mount. The way that it is set up, the router sits in its normal router base, which is bolted to a chunk of 3/4″ plywood. Since the router base is built such that the collet won’t extend beneath it, this means that changing bits is problematic, but more important, the bits all lose about 3/4″ of their cutting length. This means that a 1″ cutter which normally would have no problem eating through, say, a 3/4″ piece of ply, is now demoted to a 1/4″ cutter that can’t come close.
So it was clear that I wanted to build myself a new router mount.
What with one thing and another, there was no reason not to let the CNC machine do the cutting part, since, hey, that’s what it’s for.
It took me some time to work out all the geometry in CamBam. I even ended up cutting out a “tester” one, which ended up needing some tweaks to make it work. I may throw some photos of that “alpha” build up, just to show where my head was at.
Among things I needed:
– I wanted to make a “clamp” system
– ID needed to fit the router pretty closely, although I had some clamping action
– OD needed to be large enough not to break
– I needed a “nose” to put the clamp bolt through
– I needed a way to attach the mount to the CNC machine
All of these were on the first one I cut, but as soon as I put it up next to the CNC machine, I noted a really cool way to mount the new clamp — I could just design it to fit right where the old mount did!
There was also a problem getting the clamp over the router’s power switch, which has a little raised area.
So, back to the drawing program, and I came up with this:
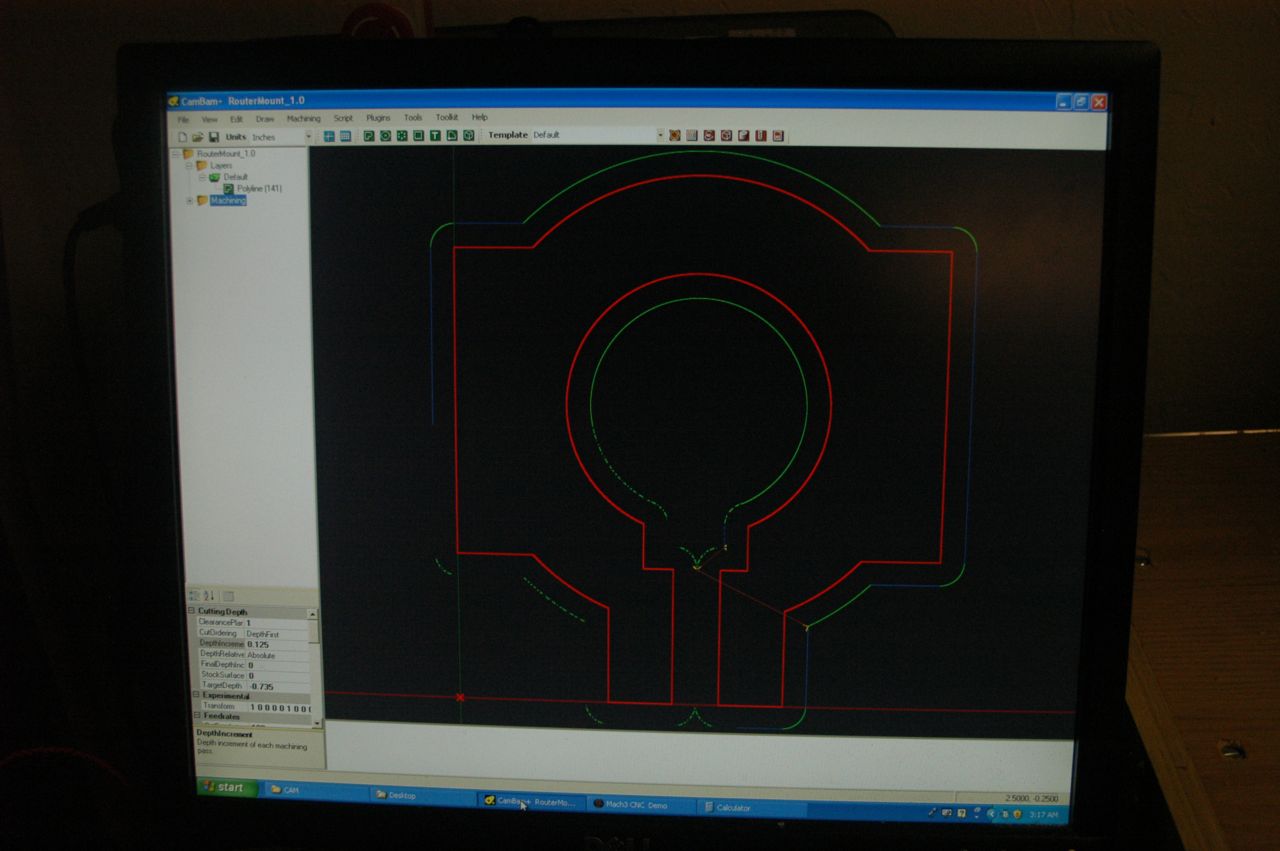
The “tabs” on the side are where the cross dowels go. I was pretty proud of myself, figuring that part out. I think the “rear” part that you can’t see because it’s close to the Z-table is my favorite part. It looks really cool. It’s real hard to do that kind of round-to-straight cut without a CNC.
You would not believe (actually, you probably would) the amount of “add a little width here, shave off a little there” that I had to do.
An aside: I’ve been playing around with the proper depth to cut. I am trying not to gouge the table but also make it all the way through the ply. At the end of the day, I don’t think both are possible at the same time, at least not with the warpy plywood I have and the probably-not-flat table. Anyway, I’m not too worried about it, but the CNC machine is definitely starting to look more like a “tool” and less like a piece of furniture as the days go by. Back to the show.
Both cuts I did tonight went really well. The router makes lots of dust, but that’s how it works, so there you go. I set one cut for 0.725″ and the other for 0.735″. Both of them ended up gouging the table and also having “tabs” to cut off (not on purpose 🙂 ). The finished product looks pretty good though.
Once the geometry was put together, loading things up in Mach3 was pretty easy. Here’s a shot of Mach3 ready to cut out the part.

Oh, I had a scary moment. I somehow knocked the power supply off the table as I was unplugging it and it pulled the power cables out of the G540 as it fell. It made a “pop” sound as the + and – wires discharged against each other. Nothing looked too burnt and it was unplugged at the time. I went inside and spent about an hour or two testing everything carefully and building some better power cables. I really need to get a case built out for this rig. I am sick of the wires running everywhere thing. Anyway, everything was fine, just delayed me a bit.
Once the part was cut out (I do a lot of vacuuming, too. I need to work out a vacuum system, more on that later), I lined it up with the old part and transferred all the drill lines. Then I used the drill press to punch in both the “face” holes (7/16″) and the “edge” holes (1/4″)! That was pretty cool, too. I should have been doing that more in the build, but I didn’t. I had to shim between the clamp arms to get the clamp hole cut. All this went really easily; I’m getting pretty good at the drill press.
The new router mount went in without a hitch. It could have been 1/8″ wider I suppose, and there’s no way to get it on the router without either pulling out the clamp bolt all the way or pulling the power cable all the way through, but that works for me.
Among other stuff that got worked on today:
– I had to reattach the X-axis transmission nut both at the beginning and at the end of the session. I *really* need to figure out a better solution for the transmission nuts. Can you say “pocketing tutorial”?
– I went to Dale Hardware to see if I could find an end mill. I didn’t find any suitable straight mills (the Roto-Zip stuff is the closest, but it’s all for 1/8″ collet; I need to figure out how to mount a different collet on the router), but I found a nice-looking “3D Carving” mill for $18. I look forward to some signage.
– While I was at Dale, I determined that they have cross dowels. For $1.25 each (I paid about $0.25ea. online). It’s nice to know that there is somewhere in town to get them, though.
– I also picked up a kit which I hoped would get my Shop Vac really spooled up to be a shop vacuum system; my vac has 1-1/4″ hose, and both the chop saw and the Dust Deputy that I am thinking about getting use 2-1/2″. So I picked up some 2-1/2″ hose, and a 2.5″-to-1.25″ hose adapter. I tried out the parts when I got home. It’s going to take a little head-scratching to figure out how to make everything actually hook up (turns out everything is tapered, and so I need some 1.25″ untapered adapters to make it all come together). That’s for another day, but I am getting closer to not having to chase the router around with a vacuum. w00t!
– I found a CNC shop online that sells 48v 20A relays. Means I can hook straight to the G540 power supply. 2 of those will let me drive the router and the vacuum from Mach3!
Next up, case mount for the rig. I will rip apart the PC to see if there is room inside the case. Otherwise, I may scrounge another PC case. If that doesn’t work, I’ll head to Fry’s with some measurements. I need to make sure I have enough room to mount everything, plus I need a fan. This is still in the design stage, obviously.
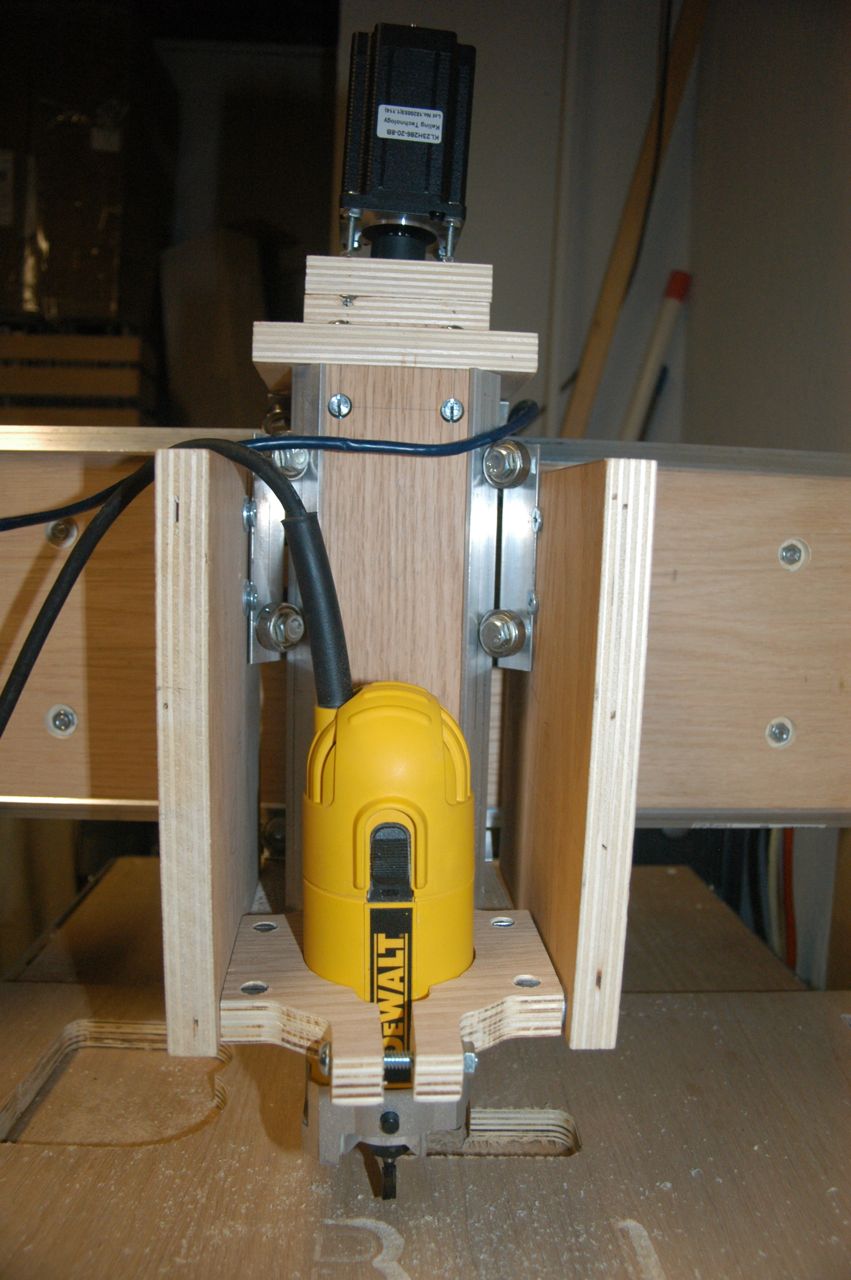
I just can’t resist: here’s one last shot of the new (and improved!) Z axis:
You are really progressing. Now if you can figure how to attach your CNC machine to my lathe I think we can make a nice cedar canoe and a totem pole. Congrats on your progress. I can’t wait to see your first project.
Cliff
It seems that this project is on for xMas. There is nothing you can not deliver on now.
Wow
Hee hee!
Just don’t turn your back on it!